|
WA8LMF Home Page | Main Ham Radio Page | Main Links Page | Updated 01 August 2009 |
The CD-ROM part of this disk should autorun and display a directory of files, including this one, automatically when inserted into a computer optical drive. The (hidden) audio part WILL NOT start playing automatically on a computer drive. On a computer CD drive, right-click the CD drive icon in the Windows File Explorer or “My Computer” and choose “Play” to force the audio part of this disk to play. This should launch your default audio player application.
Playing back standard CD audio rather than CD-ROM .wav data files avoids the timing errors and incorrect playback sample rates that often accompany low-cost software-based (i.e. motherboard AC97) PC sound systems. It also avoids the mangling of data waveforms that may occur with MP3 or other lossy compression formats.
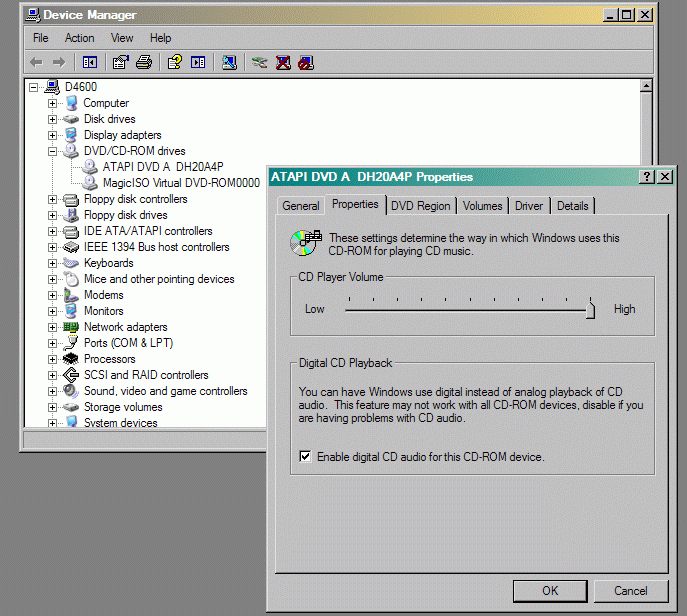
Note that some recent PC CD-drives now extract audio digitally rather than using the digital-to-analog converters inside the CD drive for audio playback; i.e. there is no separate analog audio output and cable from the CD drive to the computer sound system. Check the properties of the CD/DVD Drive in the Windows Device Manager. If a box for "Enable Digital CD Audio..." is checked, you have this kind of system. In this case, take the audio directly from the front panel earphone jack of the drive rather than from the computer sound system, if possible. Again, the objective is to avoid the timing errors and out-of-tolerance audio playback sampling rates of cheap computer sound systems, if possible.
The audio files could also be played on an old CD-ROM drive standalone, without a computer, by connecting the TNC under test to the drive's front panel earphone jack, or to the 4-pin analog audio jack on the drive's rear panel. (A CD-ROM drive normally doesn't need computer support to play audio CDs. A drive with a front panel volume control and track-select button is preferred.)
To aid in selecting the cuts on a CD-ROM drive that lacks a front-panel track-number indicator, voice announcements and cue tones have been added to the beginning and end of each track.
Track 1 has a DTMF digit "1" at the beginning and a DTMF digit "6" at the end.
Track 2 has a DTMF digit "2" at the beginning and a DTMF digit "7" at the end.
Track 3 has a DTMF digit "3" at the beginning and a DTMF digit "8" at the end.
Track 4 has a DTMF digit "4" at the beginning and a DTMF digit "9" at the end.
Track 5 has a DTMF digit "5" at the beginning and a DTMF digit "0" at the end
The differing digit values could possibly be used with a DTMF decoder to automatically start or stop data acquisition devices.
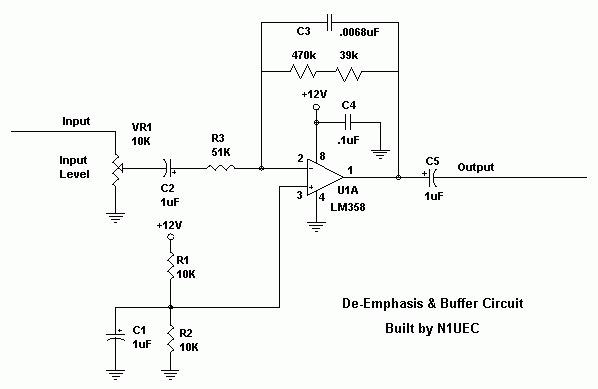
Note that all these recordings are taken directly from the discriminator. Tracks 1, 3 and 4 are not de-emphasized. Track 2 is de-emphasized (see below). If you wish to characterize how various TNCs behave when connected to a radio's speaker or headphone output (rather than directly from the discriminator such as from a 6-pin mini-DIN "data" jack.), you will have to insert an RC de-emphasis network between the CD player and the device under test. Click Here for a schematic of an active version of such a circuit.
A very useful APRS program for this kind of testing is KH2Z's APRS+SA a.k.a "APRSplus" because it keeps a running count of the number of times each station has been heard. Thus one can easily compare the number of successful decodes different TNCs produce. Both track 3 and track 4 are recordings exclusively of a single callsign (WA8LMF), making this comparison of number of decodes very simple.
Track
1 is an off-the-air recording of
40 minutes of activity on 144.39 MHz in Los Angeles, California, during
the afternoon rush hour at about 5:00 PM when the channel is totally
saturated to several hundred percent of the Aloha threshold. This
recording was taken from the non-de-emphasized direct discriminator
output of a Yaesu FT-1500 via the 6-pin mini-din data connector. It
contains a variety of over- and under- deviated signals, packet
collisions, rapid-fire packets with practically no pause between them,
raw NMEA string trackers, TinyTraks, clueless idiots using CW ID on
packet, etc. All periods of dead air over about 1 second have been
edited out so that 40 minutes of real-life activity have been
compressed to 25 minutes on the CD.
This track is intended to be played back directly into TNCs to compare
the performance of various TNCs "under fire" in the real world . The
rapid pace of the packets should be a good test of the ability of
buffers in TNCs and associated applications to hand a rapid flow of
data without overrunning.
Track 2 is identical to Track 3 except that a precise 6db-per-octave/20db-per-decade de-emphasis between 300 and 3000 Hz has been applied to simulate the typical de-emphasis found at the volume control or speaker output of the typical land-mobile receiver. This can used to evaluate the relative performance of TNCs in handling raw non-deemphasized discriminator audio vs de-emphasized speaker audio. The effectiveness of jumper-selected equalization networks available inside some TNCs can also be tested. This track was created by applying the graphic equalizer filter in Adobe Audition, shown below, set to simulate the standard EIA land-mobile radio de-emphasis curve.
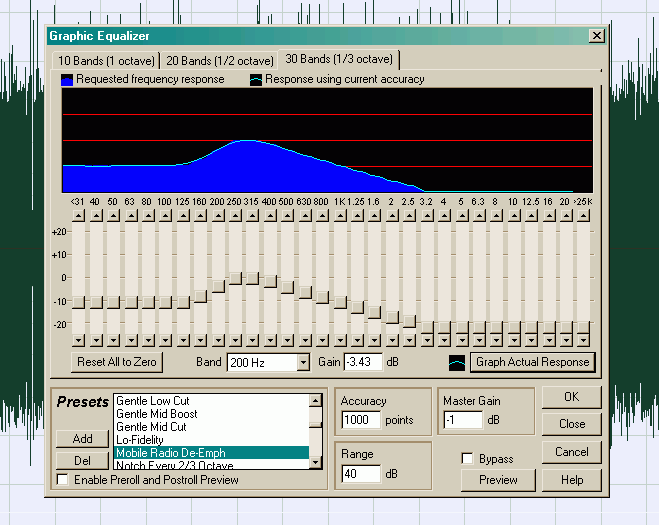
Note that a roll-off was also applied below about 200 Hz to simulate the typical highpass filtering used to keep CTCSS ("PL") tones out of the speaker of mobile radios.
The three following tracks are for TNC alignment rather than testing. They are intended to evaluate TNC demodulator tolerance to tone "skew" (unequal levels of the 1200 and 2200 Hz tones).
Track
5 is a direct recording of one
minute of a KPC3+ TNC in the CAL mode sending the alternating 1/0 test
pattern (i.e. alternating between 1200 and 2200 Hz tones) with both
tones at the same amplitude.
Track
6 is the same recording with a
precise 6 dB/octave 20 dB/decade pre-emphasis applied as in Track 3
above. This is the pre-emphasis curve set in the Audition audio editor.
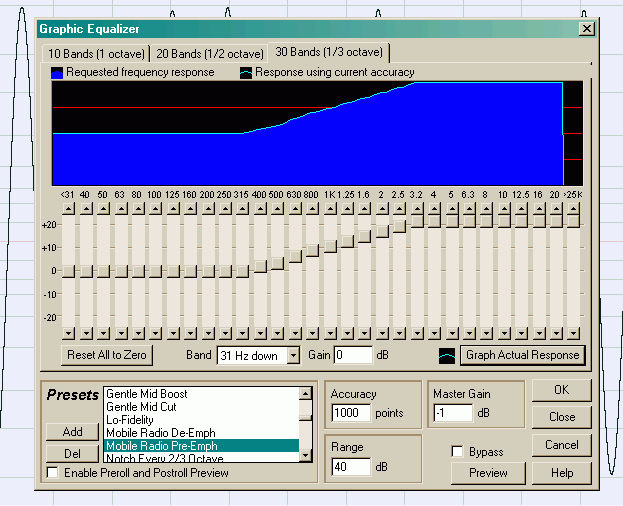
Track 7 is the same recording with a mirror-image precise 6 dB/octave 20 dB/decade de-emphasis applied.
Click links for examples of FLAT Response, PRE-Emphasized, and DE-Emphasized waveforms.
(c) Stephen H. Smith
Revised 31 August 2009
Original published 30 October 2006
wa8lmf.net